Trackers 跟踪
MASSIVE X's four Trackers are modulation sources that provide deep functionality for advanced MIDI control.
MASSIVE X 的四个跟踪器是调制源,为高级 MIDI 控制提供深度功能。
The four Trackers are modulation sources that provide deep functionality for advanced keyboard tracking. They map incoming MIDI control data like pitch and velocity to modulation that you can apply to any parameter. This enables you to exactly define how your sound responds to the MIDI input.
四个跟踪器是调制源,为高级键盘跟踪提供深度功能。它们将传入的 MIDI 控制数据(如音高和速度)映射到可以应用于任何参数的调制。这使您能够准确定义声音对 MIDI 输入的响应方式。
The Tracker's Tracking view allows you to view and create curves and offset values that represent the relationship between the MIDI input and the modulation produced by the Tracker. Each Tracker can be used with one of five available sources: Note Pitch, Velocity On, Velocity Off, Gate, and Inverse Gate.
跟踪器的跟踪视图允许您查看和创建曲线和偏移值,这些曲线和偏移值表示 MIDI 输入与跟踪器产生的调制之间的关系。每个跟踪器都可以与以下五个可用源之一一起使用:Note Pitch、Velocity On、Velocity Off、Gate 和 Inverse Gate。
As an example, you can use Note Pitch to define the response of your sound to the pitch values of incoming MIDI notes. When setting the Tracker's curve to a linear, rising ramp, it can be applied to parameters for standard keyboard tracking, meaning low notes produce low parameter values, and high notes produce high parameter values. In this case, the values produced by each MIDI note increase linearly across the keyboard, from left to right. By changing the Tracker's curve from a linear, rising ramp to other shapes or even adding irregular offsets to it, you can break up this relationship. For instance, inverting the curve to a falling ramp would result in high parameter values when playing low notes and vice versa, or adding extreme offsets to specific notes would produce high parameter values only when playing the corresponding keys.
例如,您可以使用音符音高来定义声音对传入 MIDI 音符的音高值的响应。当将跟踪器的曲线设置为线性上升斜坡时,它可以应用于标准键盘跟踪的参数,这意味着低音符产生低参数值,高音符产生高参数值。在这种情况下,每个 MIDI 音符产生的值在键盘上从左到右线性增加。通过将跟踪器的曲线从线性上升斜坡更改为其他形状,甚至向其添加不规则偏移,您可以打破这种关系。例如,在弹奏低音时,将曲线反转为下降斜坡会导致高参数值,反之亦然,或者仅在弹奏相应键时,向特定音符添加极端偏移量会产生高参数值。
You can access and assign the Trackers in the Editor via the Navigation Bar using the tabs labeled T1–T4. For information about assigning the Trackers to parameters, refer to Assigning Modulation.
您可以使用标有 T1–T4 的选项卡通过导航栏在编辑器中访问和分配跟踪器。有关将跟踪器分配给参数的信息,请参阅分配调制。
Tip
Learn how to use the Tracker in the following tutorials:
在以下教程中了解如何使用跟踪器:
Using the Tracker to Apply Filter Tracking to a Sound: In this tutorial, you learn how to use the Tracker's Curve mode for advanced filter tracking.
使用跟踪器将滤镜跟踪应用于声音:在本教程中,您将学习如何使用跟踪器的曲线模式进行高级滤镜跟踪。Using the Tracker to Create Delay Time Variations in a Sound: In this tutorial, you learn how to use the Tracker's Offset mode for recalling defined parameter values.
使用跟踪器在声音中创建延迟时间变化:在本教程中,您将学习如何使用跟踪器的偏移模式来调用定义的参数值。
Trackers Overview 跟踪器概述
This section provides an overview of the Tracker’s features, including the Tracking view, the Source options, and the Edit modes.
本部分概述了跟踪器的功能,包括跟踪视图、源选项和编辑模式。
Source: Selects the type of MIDI control data processed with the Tracker. The following sources are available:
来源:选择使用跟踪器处理的 MIDI 控制数据类型。提供以下资源:Note Pitch is the MIDI note value. This option retains the pitch value until another note is played. Use this source if you want to track the pitch of the notes.
音符音高是 MIDI 音符值。此选项将保留音高值,直到演奏另一个音符。如果您想跟踪音符的音高,请使用此源。Velocity On is standard, note-on velocity. This option retains the velocity value until another note is played. Use this source if you want to track the velocity of the notes.
Velocity On 是标准的音符开启速度。此选项将保留速度值,直到演奏另一个音符。如果要跟踪音符的速度,请使用此源。Velocity Off is note-off velocity. This option retains the velocity value until another note is released. Use this source if you want to track the note-off velocity of the notes.
Velocity Off 是音符关闭速度。此选项将保留速度值,直到释放另一个音符。如果要跟踪音符的音符关闭速度,请使用此源。Gate is standard, note-on velocity. This option resets the velocity value to 0 when a note is released. Use this source if you want to track the velocity of the notes you are playing, but only for as long as a note is held.
闸门是标准的,音符速度。此选项在释放音符时将速度值重置为 0。如果您想跟踪正在弹奏的音符的速度,请使用此源,但仅限于保留音符的时间。Inverse Gate is note-off velocity. This option resets the velocity value to 0 when another note is played. Use this source if you want to track the note-off velocity of the notes you are playing, but only for as long as no other note is played.
反向门是音符关闭速度。此选项在演奏另一个音符时将速度值重置为 0。如果要跟踪正在演奏的音符的音符关闭速度,请使用此源,但仅限于没有播放其他音符的时间。Tip
This is useful for controlling envelope parameters when a note is released without affecting the notes that follow.
这对于在释放音符时控制包络参数非常有用,而不会影响随后的音符。
Level: Sets the output level of modulation produced by the Tracker. At the left position, the output is at zero, at the right position, it's at 100%.
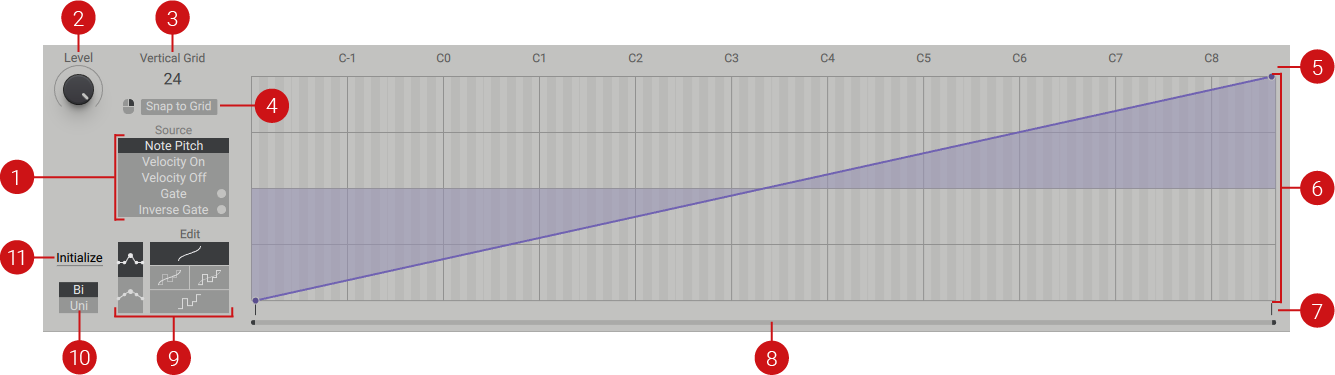
电平:设置跟踪器产生的调制输出电平。在左边,输出为零,在右边,输出为100%。Vertical grid: Sets the vertical resolution of values in the Tracking view. By default, the number of available values is set to 24 (bipolar -24 to +24, unipolar 0 - +24).
垂直网格:设置“跟踪”视图中值的垂直分辨率。默认情况下,可用值的数量设置为 24(双极性 -24 至 +24,单极性 0 - +24)。Snap to Grid: Ensures the grid value is adhered to even when making fine adjustments by holding the right-mouse button and dragging.
对齐网格:确保即使在通过按住鼠标右键并拖动进行微调时也能遵守网格值。Select zone: Click and drag in this area to select multiple breakpoints. The segments between them can be edited using the Segment Edit zone.
选择区域:单击并拖动此区域以选择多个断点。可以使用“区段编辑”区域编辑它们之间的区段进行编辑。Tracking view: Here you can draw curves and offsets that define the Tracker's modulation output using the different edit modes. The content of the other Trackers is shown as greyed out curves or offsets in the background (depending on which type of content is active in the Tracker being edited.
跟踪视图:您可以在此处绘制曲线和偏移量,以使用不同的编辑模式定义跟踪器的调制输出。其他跟踪器的内容在背景中显示为灰色曲线或偏移量(取决于正在编辑的跟踪器中处于活动状态的内容类型)。Segment Edit zone : Use this area to edit single or multiple segments between breakpoints. Clicking and dragging moves the segments to a new position in the Tracking view. Right-clicking and dragging allows you to make fine-adjustments without snapping to the grid. Double-clicking deletes segments.
区段编辑区域:使用此区域可以编辑断点之间的单个或多个区段。单击并拖动会将区段移动到“跟踪”视图中的新位置。右键单击和拖动允许您在不捕捉到网格的情况下进行微调。双击可删除区段。Zoom bar: Zooms and navigates in the Tracking view. Clicking and dragging the handles zooms in and out. Clicking and dragging the bar scrolls the contents. Double-clicking the bar zooms out completely.
缩放栏:在“跟踪”视图中缩放和导航。单击并拖动手柄可放大和缩小。单击并拖动栏可滚动内容。双击该栏将完全缩小。Edit mode: Determines whether the Tracker's modulation output is defined by a curve, offsets, or a combination of the two in the tracking view. For more information, refer to Tracking View and Edit Modes.
编辑模式:确定跟踪器的调制输出是由跟踪视图中的曲线、偏移量还是两者的组合定义。有关详细信息,请参阅跟踪视图和编辑模式。Range switch: Sets the range of the Performer to bipolar or unipolar.
量程开关:将 Performer 的范围设置为双极或单极。Initialize: Clears all curves and offsets, and resets the grid to bipolar or unipolar.
初始化:清除所有曲线和偏移,并将栅极重置为双极性或单极性。
Tracking View and Edit Modes 跟踪视图和编辑模式
The Tracking view is used to establish the relationship between the MIDI input on the horizontal axis and the Tracker's modulation output on the vertical axis. It can contain a curve, offsets, or a combination of the two. This determines not only how you interact with the Tracker, but also its modulation output.
跟踪视图用于在水平轴上建立 MIDI 输入与跟踪器在垂直轴上的调制输出之间的关系。它可以包含曲线、偏移或两者的组合。这不仅决定了您与跟踪器的交互方式,还决定了其调制输出。
The curve establishes the relationship between the MIDI input and the modulation output across the whole range. This is useful for generating modulation that responds to the MIDI input in a coherent way, adjacent MIDI input values will produce progressively changing modulation values. The shape of the curve can be set using any number of breakpoints, creating separate segments between them:
该曲线在整个范围内建立了MIDI输入和调制输出之间的关系。这对于生成以相干方式响应MIDI输入的调制很有用,相邻的MIDI输入值将产生逐渐变化的调制值。可以使用任意数量的断点来设置曲线的形状,并在它们之间创建单独的线段: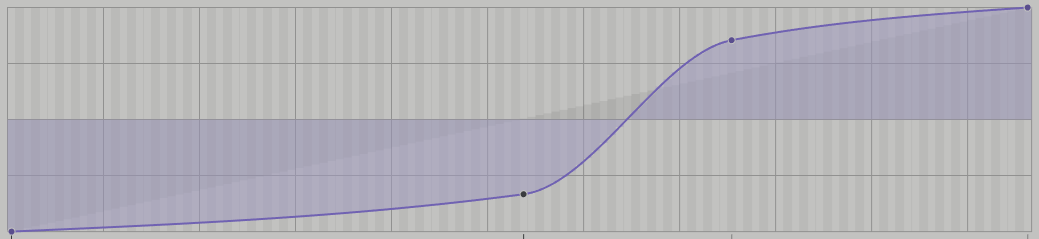
The offsets establish the relationship between specific values of the MIDI input and the modulation output. This is useful for generating modulation that responds to the MIDI input in very specific, or unexpected ways. Each MIDI input value can produce any modulation value, hence abrupt changes in modulation are possible from one MIDI input value to the next. The offsets can be painted in for each value individually:
偏移量建立MIDI输入的特定值和调制输出之间的关系。这对于生成以非常具体或意想不到的方式响应 MIDI 输入的调制非常有用。每个MIDI输入值都可以产生任何调制值,因此从一个MIDI输入值到下一个MIDI输入值的调制可能会突然变化。可以为每个值单独绘制偏移量: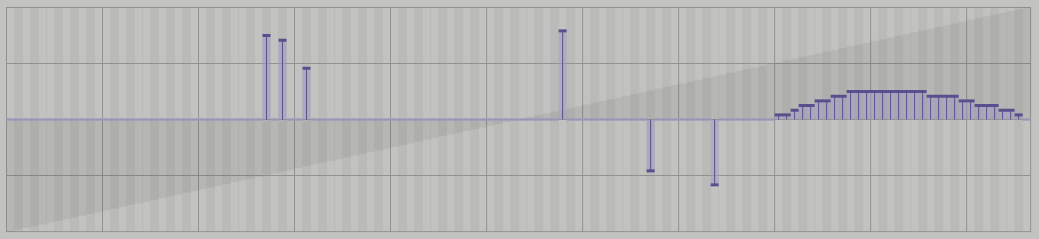
You can switch between curve and offsets using the different Edit modes:
您可以使用不同的编辑模式在曲线和偏移之间切换:
 |
Curve mode: Only the curve is active and can be edited. The following mouse interactions are available:
曲线模式:只有曲线处于活动状态,可以编辑。可以使用以下鼠标交互:Clicking on the Tracking view creates a new breakpoint.
单击“跟踪”视图将创建一个新的断点。Clicking and dragging an existing breakpoint moves it to a new position.
单击并拖动现有断点会将其移动到新位置。Right-clicking and dragging allow you to make fine-adjustments in one direction without snapping to the grid.
右键单击和拖动允许您在一个方向上进行微调,而无需捕捉到网格。
Combined Offset mode: Both the curve and the offsets are active, however only the offsets can be edited. The following mouse interactions are available:
组合偏移模式:曲线和偏移均处于活动状态,但只能编辑偏移。可以使用以下鼠标交互:Clicking and dragging adjusts the offset for multiple values.
单击并拖动可调整多个值的偏移量。Right-clicking and dragging sets multiple values to 0.
右键单击并拖动会将多个值设置为 0。Clicking, holding, and then dragging up and down adjusts the offset for a single value.
单击、按住,然后上下拖动可调整单个值的偏移量。Right-clicking, holding, and then dragging up and down allows for fine-adjustments for a single value without snapping to the grid.
右键单击、按住,然后上下拖动,可以对单个值进行微调,而无需捕捉到网格。
Offset mode: Only the offsets are active and can be edited. The following mouse interactions are available:
偏移模式:只有偏移处于活动状态,可以编辑。可以使用以下鼠标交互:Clicking and dragging adjusts the offset for multiple values.
单击并拖动可调整多个值的偏移量。Right-clicking and dragging sets multiple values to 0.
右键单击并拖动会将多个值设置为 0。Clicking, holding, and then dragging up and down adjusts the offset for a single value.
单击、按住,然后上下拖动可调整单个值的偏移量。Right-clicking, holding, and then dragging up and down allows for fine-adjustments for a single value without snapping to the grid.
右键单击、按住,然后上下拖动,可以对单个值进行微调,而无需捕捉到网格。
Combined Curve mode: Both the curve and the offsets are active, however only the curve can be edited. The following mouse interactions are available:
组合曲线模式:曲线和偏移均处于活动状态,但只能编辑曲线。可以使用以下鼠标交互:Clicking on the Tracking view creates a new breakpoint.
单击“跟踪”视图将创建一个新的断点。Clicking and dragging an existing breakpoint moves it to a new position.
单击并拖动现有断点会将其移动到新位置。Right-clicking and dragging allow you to make fine-adjustments in one direction without snapping to the grid.
右键单击和拖动允许您在一个方向上进行微调,而无需捕捉到网格。
Absolute breakpoint editing: Sets the behavior when editing breakpoints to absolute. Moving a breakpoint only affects the breakpoint and its corresponding segments. This option is only available in Curve mode and in Combined Curve mode.
绝对断点编辑:将编辑断点时的行为设置为绝对断点。移动断点仅影响断点及其对应的段。此选项仅在“曲线”模式和“组合曲线”模式下可用。Relative breakpoint editing: Sets the behavior when editing breakpoints to relative. Moving a breakpoint also affects the other breakpoints by shifting their position relative to a virtual rubber band. This option is only available in Curve mode and in Combined Curve mode.
相对断点编辑:将断点编辑为相对断点时的行为设置为相对断点。移动断点也会通过移动其他断点相对于虚拟橡皮筋的位置来影响其他断点。此选项仅在“曲线”模式和“组合曲线”模式下可用。
Using the Tracker to Apply Filter Tracking to a Sound
使用跟踪器将滤镜跟踪应用于声音
使用跟踪器将滤镜跟踪应用于声音
Filter tracking is a common feature found in synthesizer filters that forces the cutoff frequency to follow the pitch of incoming MIDI notes. When filter tracking is applied, low notes result in lower cutoff values, producing a darker sound. High notes result in higher cutoff values, producing a brighter sound. All resonant filters in MASSIVE X offer filter basic tracking.
滤波器跟踪是合成器滤波器中的一项常见功能,它强制截止频率跟随传入 MIDI 音符的音高。当应用滤波器跟踪时,低音会导致较低的截止值,从而产生较暗的声音。高音会导致更高的截止值,产生更明亮的声音。MASSIVE X 中的所有谐振滤波器都提供滤波器基本跟踪功能。
However, by using a Tracker to apply filter tracking to a sound, you can fully control the response to incoming notes. You can use this to intensify the effect or create chaotic behavior. It is also possible to invert the response. In this case, low notes produce a brighter sound, and high notes produce a darker sound.
但是,通过使用跟踪器将过滤器跟踪应用于声音,您可以完全控制对传入音符的响应。您可以使用它来增强效果或创建混乱行为。也可以反转响应。在这种情况下,低音产生更明亮的声音,而高音产生更暗的声音。
The following tutorial shows you how to apply filter tracking to a sound and change the response of the tracking:
以下教程介绍如何将滤波器跟踪应用于声音并更改跟踪的响应:
Open MASSIVE X and keep the preset Init - Massive X selected.
打开 MASSIVE X 并保持预设的 Init - Massive X 处于选中状态。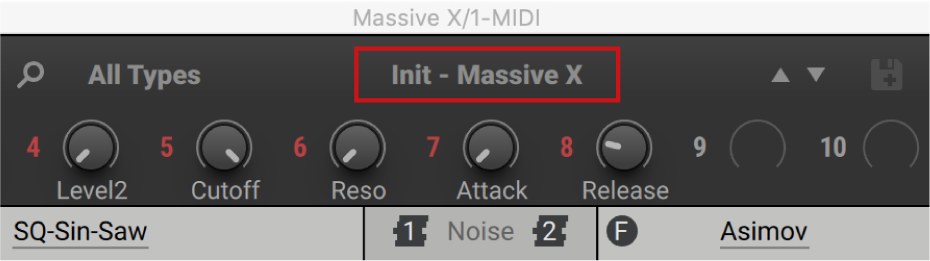
Set both the Freq and Res controls on the Asimov filter to noon.
将 Asimov 滤镜上的 Freq 和 Res 控件都设置为中午。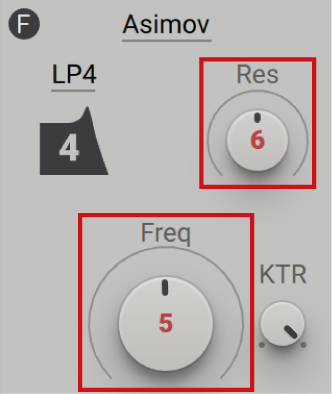
Select the Tracker T1 in the navigation bar to show it in the editor.
在导航栏中选择跟踪器 T1 以在编辑器中显示它。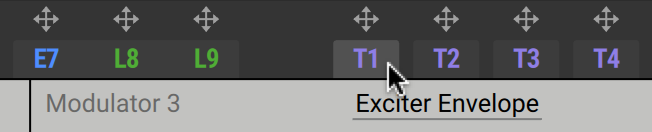
For this workflow, set the Tracker to Note Pitch and Curve mode. The preset Init - Massive X already includes the correct settings.
对于此工作流程,将跟踪器设置为“注意俯仰和曲线”模式。预设的 Init - Massive X 已经包含正确的设置。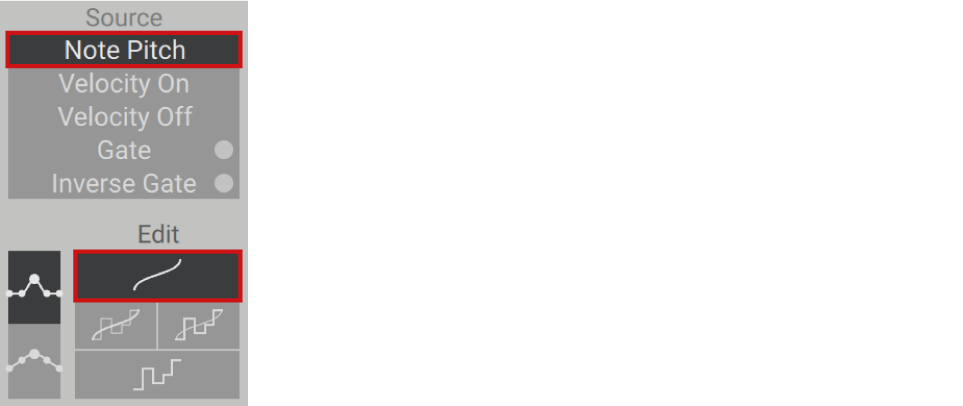
Drag and drop the arrow icon for T1 to the first modulation slot of the Freq control.
将 T1 的箭头图标拖放到 Freq 控件的第一个调制插槽中。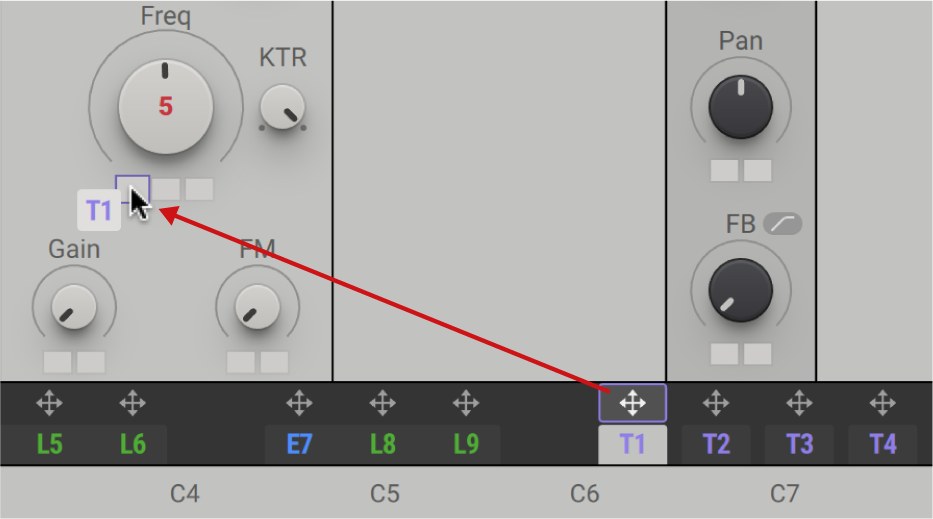
Click and drag the first modulation slot of the Freq control up to set the maximum modulation amount for the Tracker.
单击并向上拖动频率控件的第一个调制槽,以设置跟踪器的最大调制量。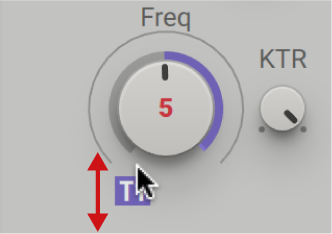
Play some notes on your keyboard or a sequence in your host software. You can see the active note being highlighted by a vertical bar in the Tracker's Tracking view.
在键盘上播放一些音符或在主机软件中播放序列。您可以在跟踪器的“跟踪”视图中看到活动笔记由垂直条突出显示。Tip
The curve in the Tracking view represents the values of the Tracker's modulation output (y-axis) for each MIDI note (x-axis).
“跟踪”视图中的曲线表示每个 MIDI 音符(x 轴)的跟踪器调制输出(y 轴)值。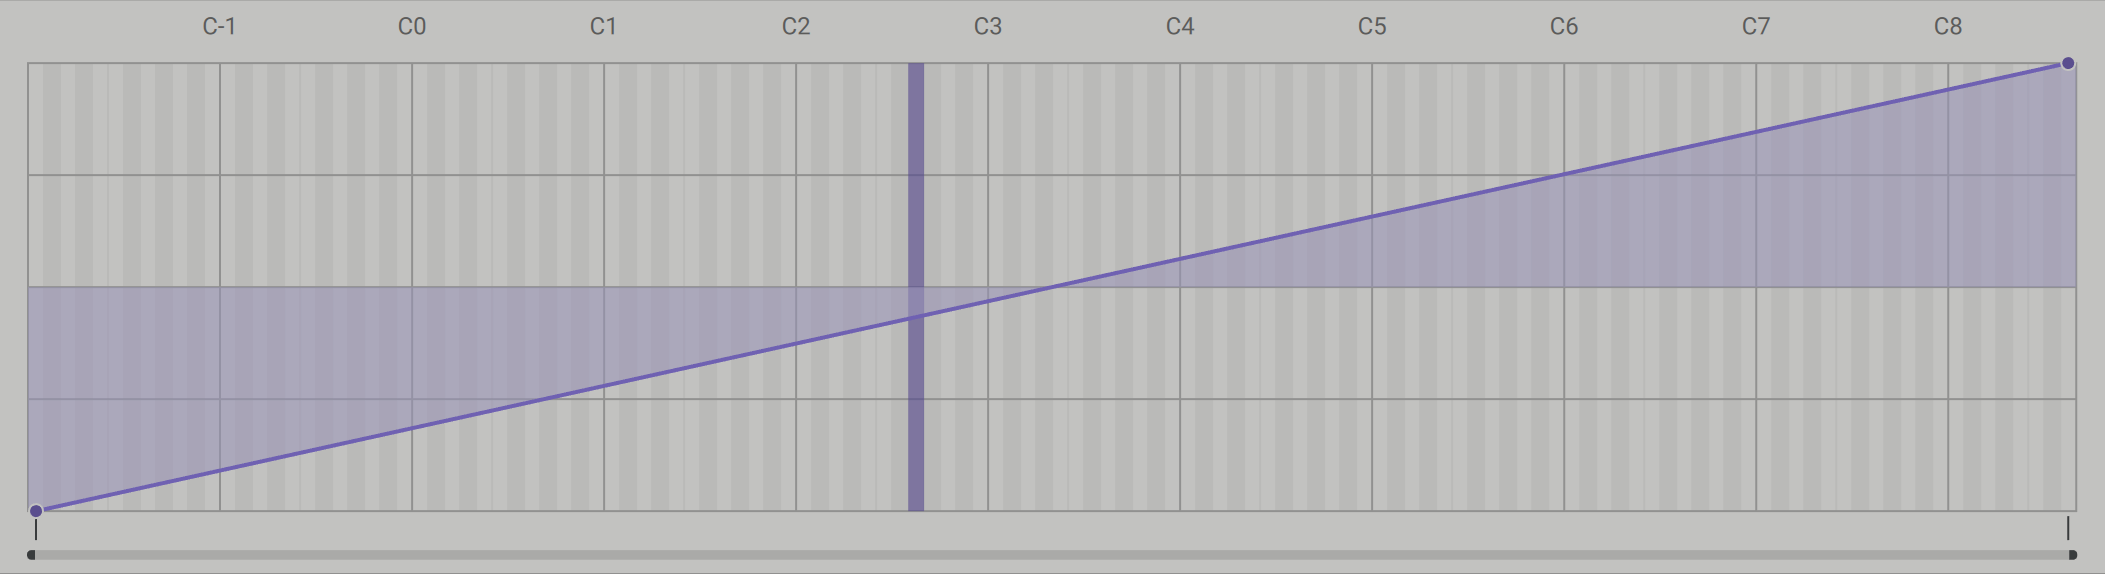
Click on the curve in the Tracking view to create a new breakpoint.
单击“跟踪”视图中的曲线以创建新的断点。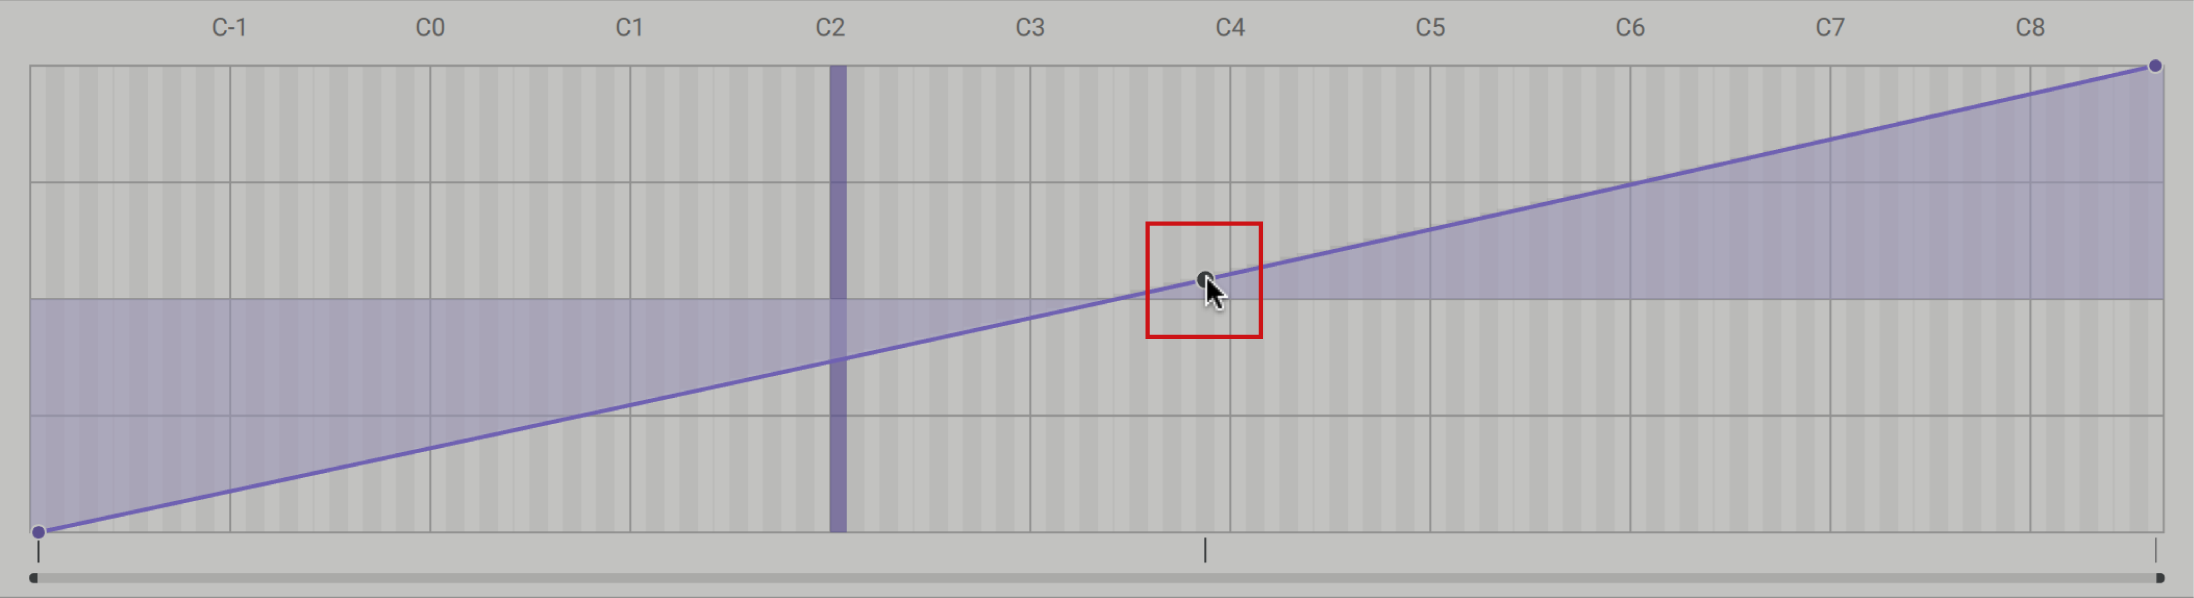
Click and drag the breakpoint in any direction to adjust the curve and therefore the Tracker's response to incoming notes.
单击并向任意方向拖动断点以调整曲线,从而调整跟踪器对传入笔记的响应。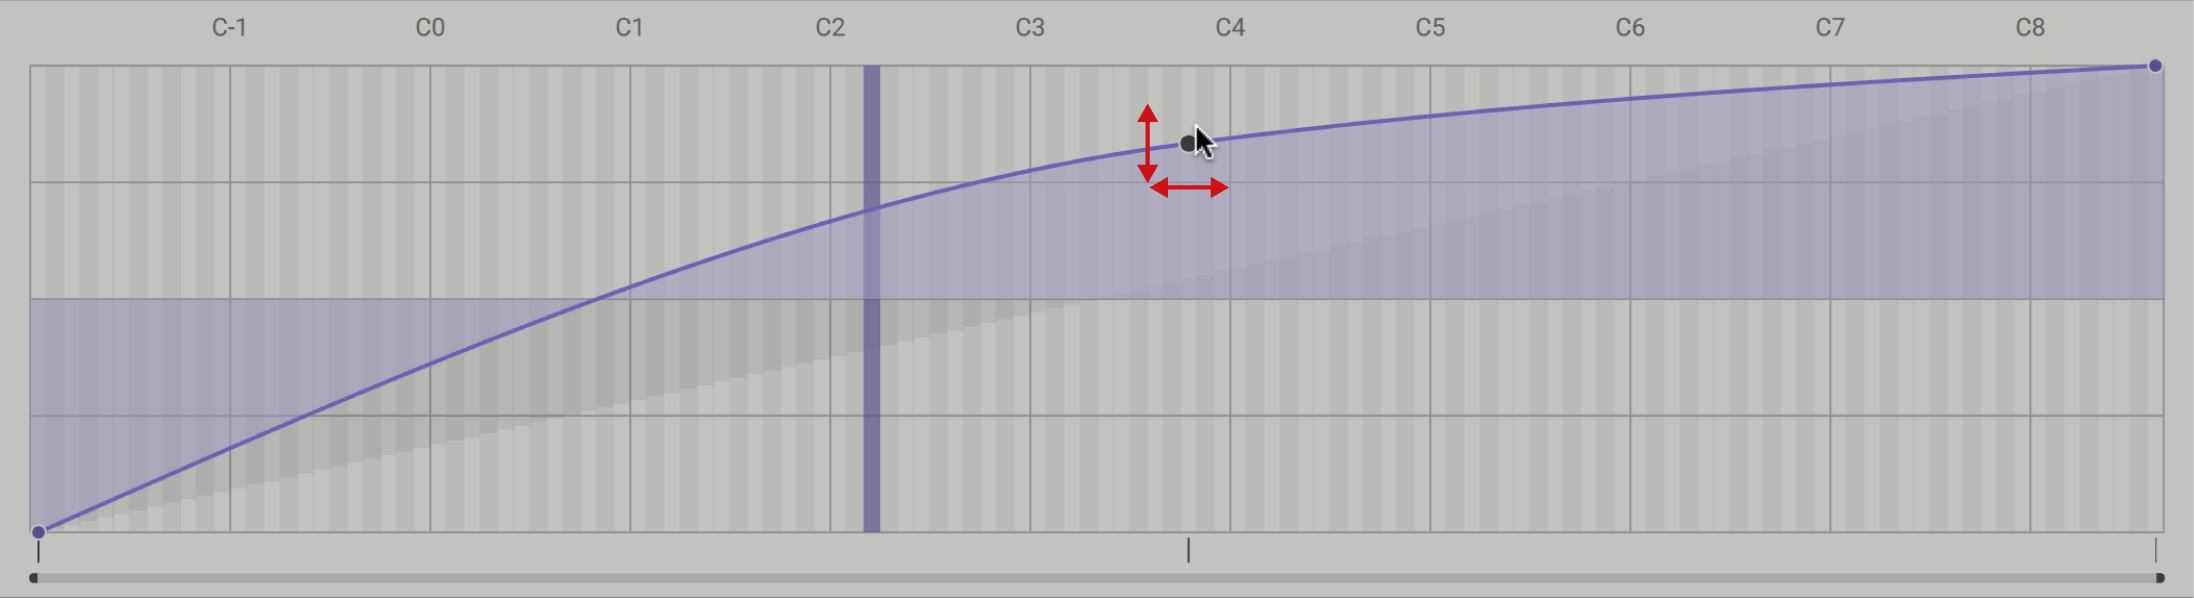
Repeat steps 7 and 8 to add a breakpoint in another position. By changing the position of the breakpoints, you can create a more extreme response to incoming notes. For example, by setting the breakpoints as shown below, the cutoff frequency rises strongly between notes C1 and C4, but stays at the respective value outside of this range.
重复步骤 7 和 8 以在另一个位置添加断点。通过更改断点的位置,您可以创建对传入笔记的更极端的响应。例如,通过设置如下所示的断点,音符 C1 和 C4 之间的截止频率会大幅上升,但会保持在该范围之外的相应值。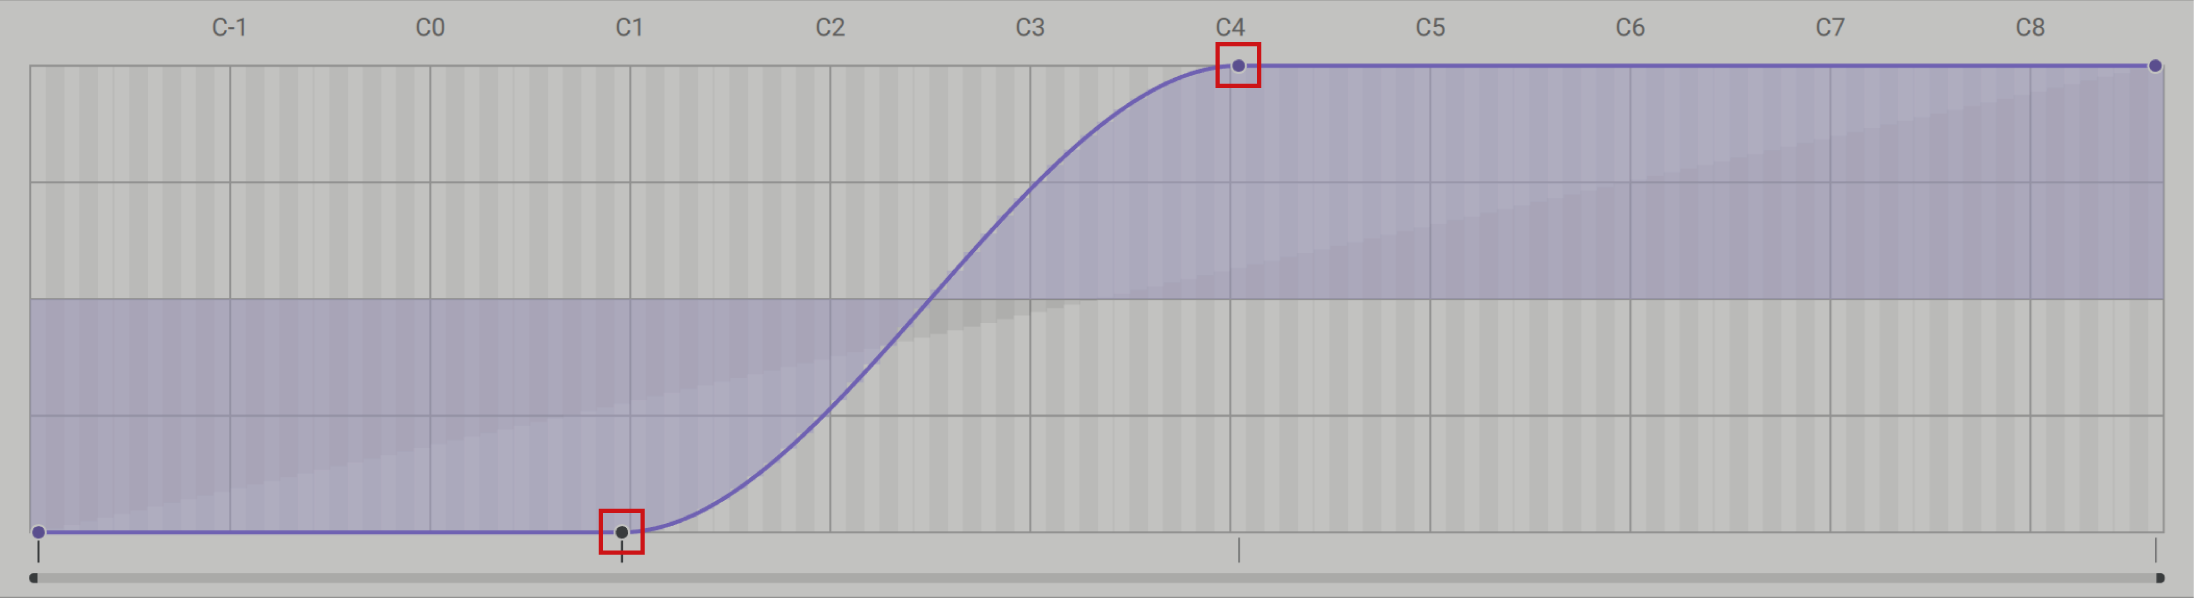
The cutoff frequency follows the pitch of incoming MIDI notes relative to the curve in the Tracking view. In the example above, notes lower than C1 produce a dark sound with the cutoff frequency at a minimum. Between C1 and C4, the sound becomes brighter with every note. Notes higher than C4 produce a bright sound with the cutoff frequency at the maximum.
截止频率遵循传入 MIDI 音符相对于“跟踪”视图中曲线的音高。在上面的示例中,低于 C1 的音符会产生暗音,截止频率最小。在 C1 和 C4 之间,每个音符的声音都会变得更亮。高于 C4 的音符会产生明亮的声音,截止频率最大。To invert the response of the tracking, drag all breakpoints including the ones at the two ends of the curve fully up or down, respectively. Following the example above, the inverted curve is as follows:
若要反转跟踪的响应,请分别向上或向下拖动所有断点,包括曲线两端的断点。按照上面的例子,倒置曲线如下: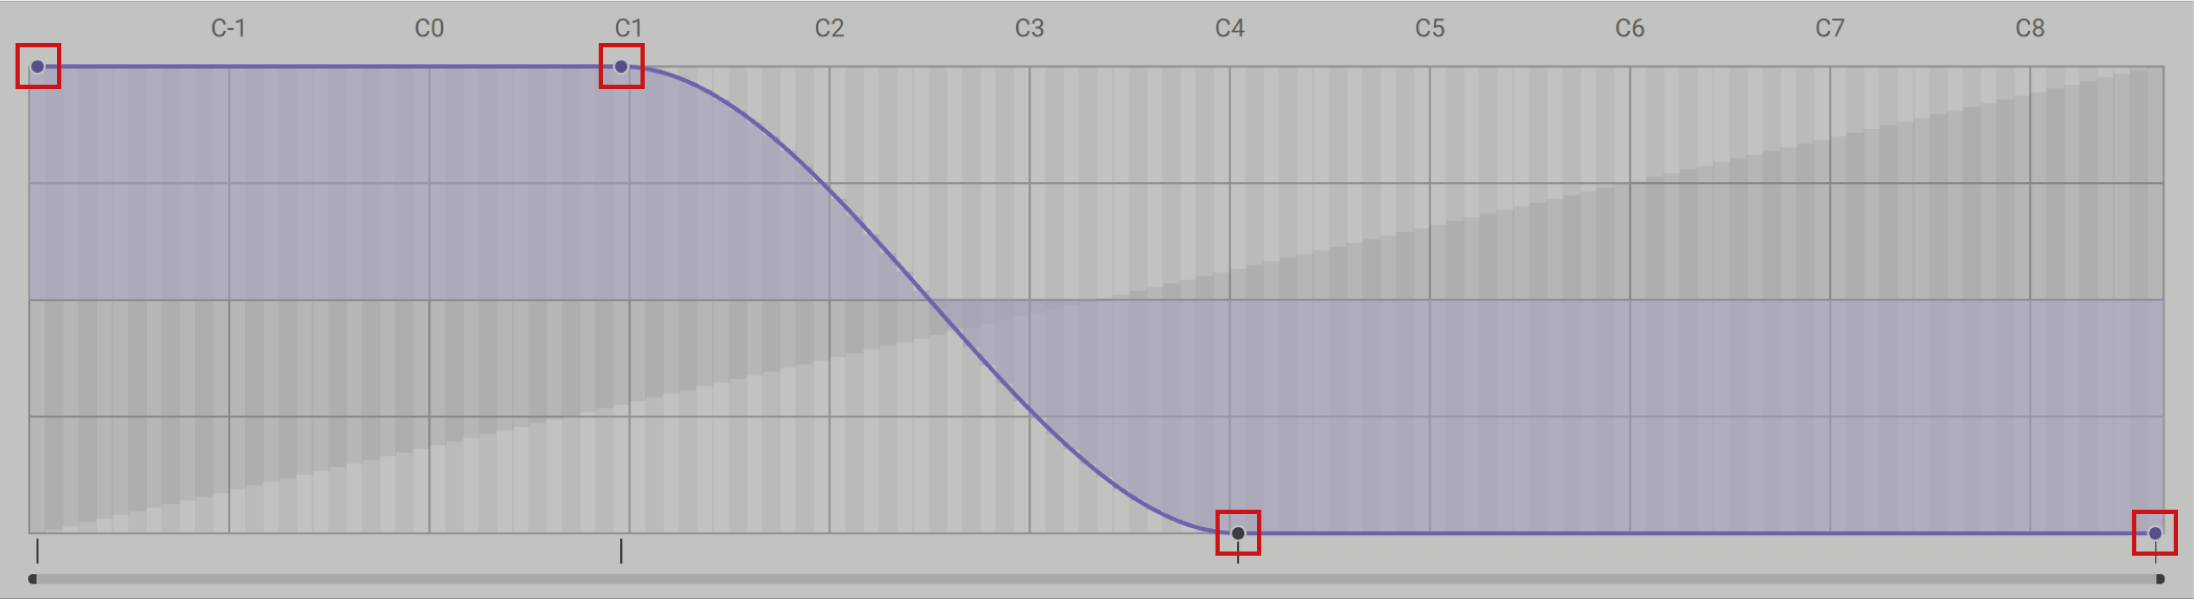
The cutoff frequency follows the pitch of incoming MIDI notes in an inverted fashion: low notes produce a brighter sound, and high notes produce a darker sound.
截止频率以倒置的方式跟随传入的 MIDI 音符的音高:低音产生更明亮的声音,高音产生更暗的声音。
Using the Tracker to Create Delay Time Variations in a Sound
使用跟踪器在声音中创建延迟时间变化
使用跟踪器在声音中创建延迟时间变化
The Tracker's Offset mode can be used to make a sound respond to incoming MIDI notes in a very specific way. When combined with the Source Note Pitch, the modulation produced by the Tracker is defined independently for each note, by drawing in single values in the Tracking view. This is useful for fine-tuning a sound's behavior at specific pitches, or for creating anything from subtle to drastic sound variations across the keyboard.
跟踪器的偏移模式可用于使声音以非常特定的方式响应传入的 MIDI 音符。当与源音符音高结合使用时,通过在跟踪视图中绘制单个值,跟踪器产生的调制为每个音符独立定义。这对于微调声音在特定音高下的行为,或在键盘上创建从微妙到剧烈的声音变化非常有用。
The following tutorial shows you how to use Offset mode to recall defined delay time values when playing specific notes:
以下教程向您展示如何在弹奏特定音符时使用偏移模式调用定义的延迟时间值:
Open MASSIVE X and select the preset Advanced Optics.
打开 MASSIVE X 并选择预设的高级光学器件。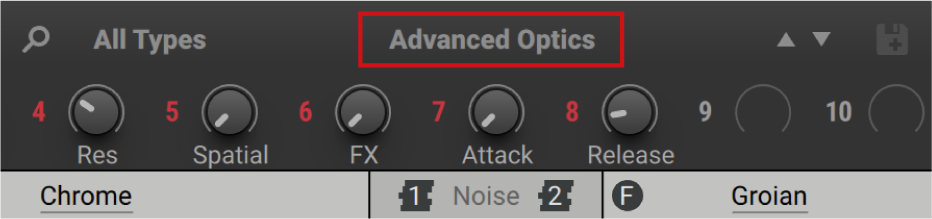
You can play the preset from your keyboard, however for this tutorial we recommend to program and play back a sequence of short notes with long pauses.
您可以从键盘播放预设,但是在本教程中,我们建议对一系列短音符进行编程和播放,并带有长时间的停顿。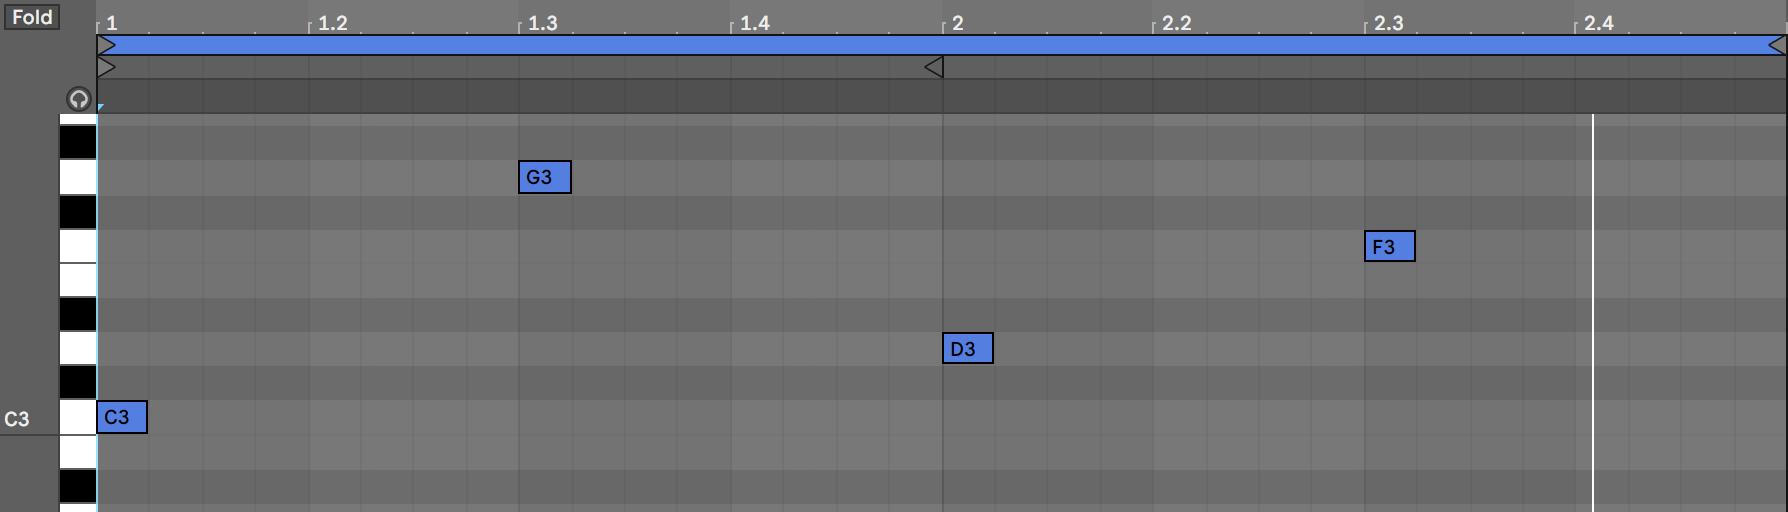
Turn the FX macro fully clockwise to make the echo effect in this preset more pronounced.
顺时针旋转 FX 宏可使此预设中的回声效果更加明显。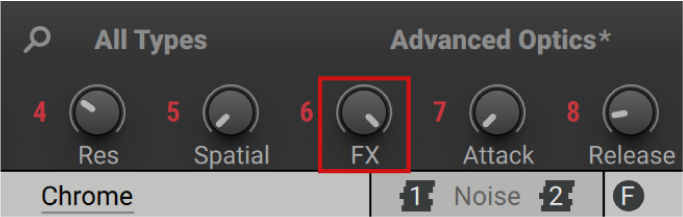
Show the Stereo Delay effect by clicking on the Z Stereo Effect slot.
通过单击 Z Stereo Effect 插槽来显示立体声延迟效果。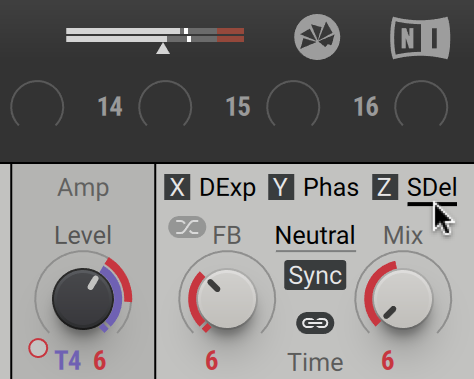
Adjust the individual delay times next to the delay time fader to create a variety of rhythmic echo effects depending on the position of the control.
调整延迟时间推子旁边的各个延迟时间,以根据控件的位置创建各种有节奏的回声效果。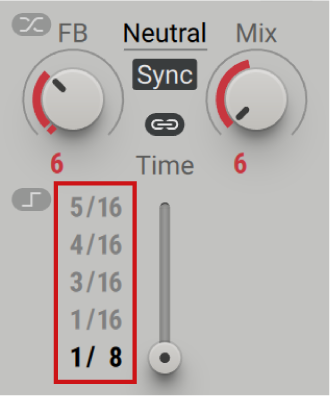
Select the Tracker T1 in the navigation bar to show it in the editor.
在导航栏中选择跟踪器 T1 以在编辑器中显示它。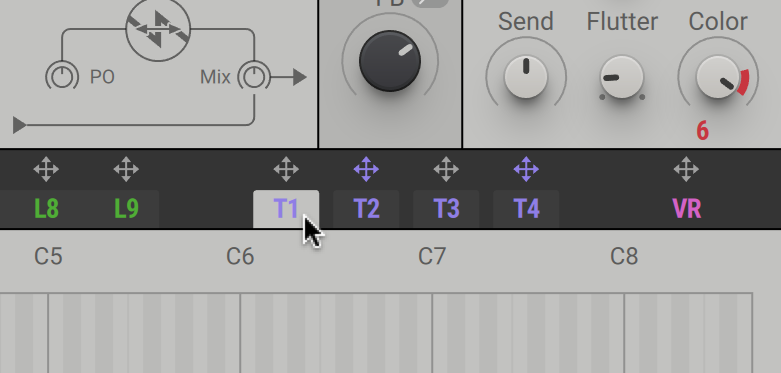
For this workflow, set the Tracker to Note Pitch mode. The preset Advanced Optics already includes the correct setting.
对于此工作流程,将跟踪器设置为音符音高模式。预设的 Advanced Optics 已经包含正确的设置。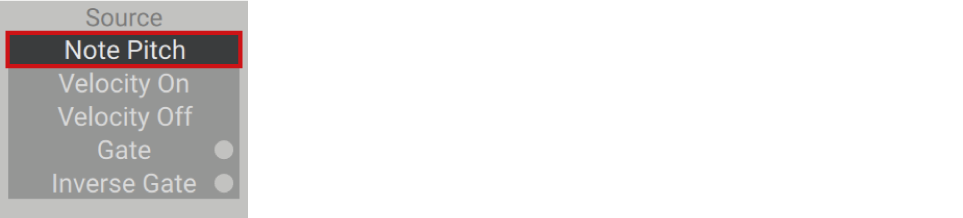
Enable Offset mode in the left area of the Tracker.
在跟踪器的左侧区域启用偏移模式。
Set the resolution of the Vertical Grid to 4 in the left area of the Tracker.
在跟踪器的左侧区域中将垂直网格的分辨率设置为 4。Note
注意 By setting the resolution to 4, the Vertical Grid corresponds to the number of available values for the delay time control. This makes it easy to adjust the offset amounts in a meaningful way.
通过将分辨率设置为 4,垂直网格对应于延迟时间控制的可用值数。这样可以很容易地以有意义的方式调整偏移量。
Drag and drop the arrow icon for T1 to the first modulation slot of the delay time control.
将 T1 的箭头图标拖放到延迟时间控件的第一个调制槽中。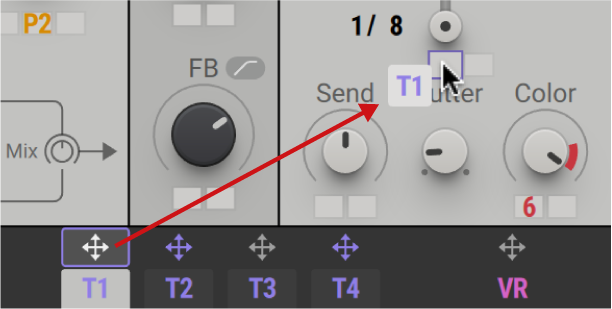
Click and drag the first modulation slot of the delay time control up to set the maximum modulation amount for the Tracker.
单击并向上拖动延迟时间控件的第一个调制槽,以设置跟踪器的最大调制量。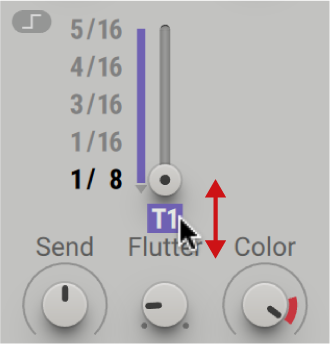
Play back the previously programmed sequence in your host software. You can see the active note being highlighted by a vertical bar in the Tracker's Tracking view.
在主机软件中播放先前编程的序列。您可以在跟踪器的“跟踪”视图中看到活动笔记由垂直条突出显示。Tip
The offsets in the Tracking view represent the values of the Tracker's modulation output (y-axis) for each MIDI note (x-axis).
“跟踪”视图中的偏移量表示每个 MIDI 音符(x 轴)的跟踪器调制输出(y 轴)值。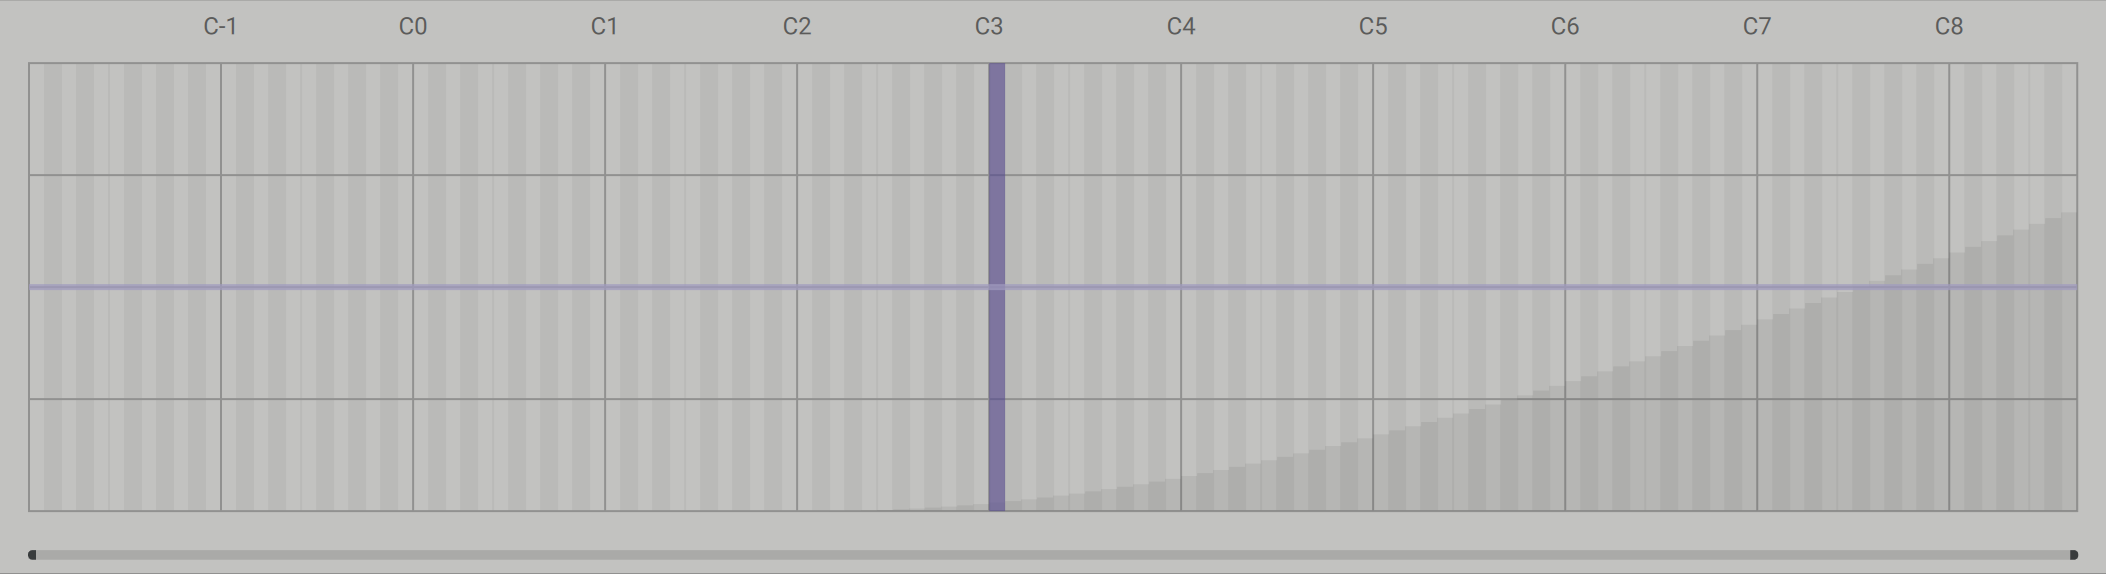
Click and drag the offset amount for one of the notes in the sequence to change the Tracker's response to this note.
单击并拖动序列中其中一个音符的偏移量,以更改跟踪器对此音符的响应。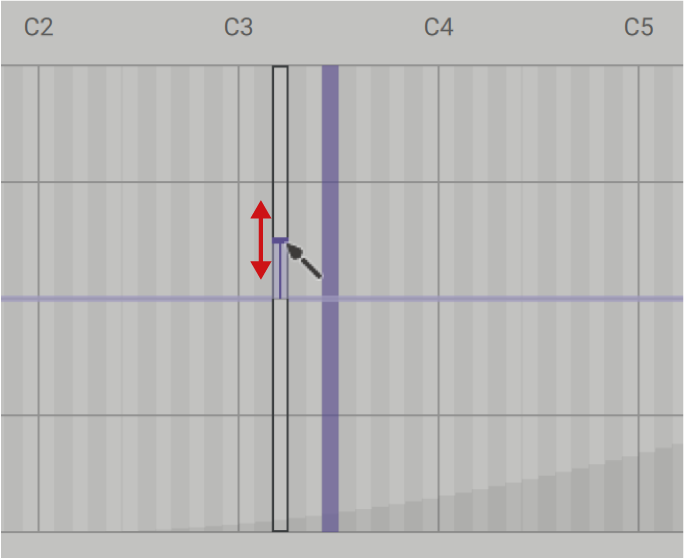
Repeat step 12 for the other notes in the sequence. By changing the offset amounts, you can define the delay time for each note independently. For example, by setting the offset amounts as shown below, C3 recalls a delay time of 1/8 (first value of the control), D3 recalls 1/16 (second value of the control), F3 recalls 4/16 (fourth value of the control), and G3 recalls 3/16 (third value of the control).
对序列中的其他音符重复步骤 12。通过更改偏移量,您可以独立定义每个音符的延迟时间。例如,通过设置如下所示的偏移量,C3 调用延迟时间为 1/8(控件的第一个值),D3 调用 1/16(控件的第二个值),F3 调用 4/16(控件的第四个值),G3 调用 3/16(控件的第三个值)。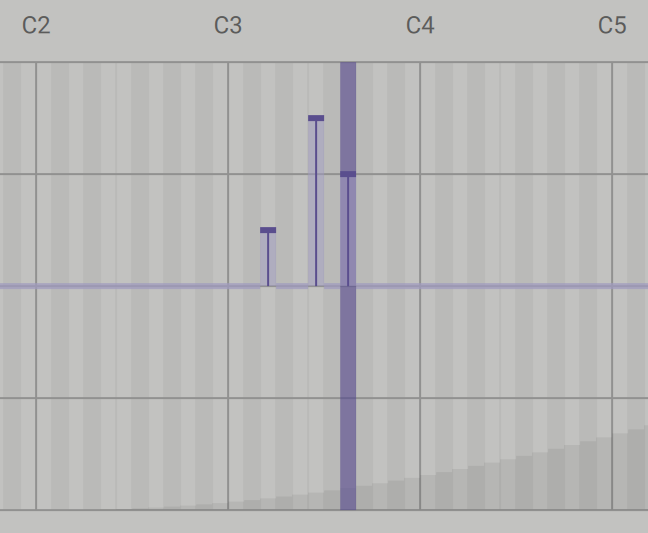
The delay time responds to specific MIDI notes relative to the respective offset amount. In the example above, the notes C3, D3, F3, and G3 each recall different delay time values for a variety of rhythmic echo effects.
延迟时间响应相对于相应偏移量的特定 MIDI 音符。在上面的示例中,音符 C3、D3、F3 和 G3 分别调用了各种有节奏的回声效果的不同延迟时间值。